Friday, March 12, 2010

Recipe: Chicken and Slow Poached Egg Rice Bowl; New Style "Oyakodon"

So the salad was delicious, but it wasn't filling enough for dinner. I had one more slow poached egg, so I thought about making a savory dish. I had a package of free range boneless chicken thighs inside my fridge. Then I thought Chicken and egg, Oyako Donburi!!!

Oyako Donburi (literally means "parent and child donburi"in Japanese), is a rice bowl dish in which chicken, egg and other ingredients are simmered together in a sauce and then served on top of a large bowl or rice. The name of the dish, "parent and child donburi," is a poetic reflection of the fact that both chicken and egg are used in the dish.

I made a modern version of the dish, with a similar sauce to Oyako Don, consisting of soy sauce, sake, and Mirin (sweet cooking sake), but instead of scrambled eggs, I used the unconventional slow poached egg.


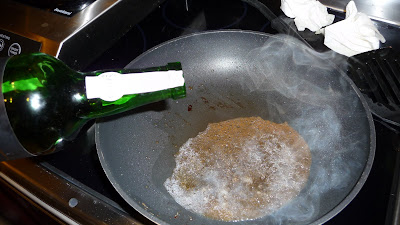
Cook chicken thighs; first by browning the skin, then flipping the chicken and adding sake, sweet cooking sake, and soy sauce. Everything smells delicious.

The second Onsen Tamago came out perfect, with a soft silky white and a creamy yolk.

Just get a bowl of rice and add chicken pieces with egg in the center, and voila! A simple, yet delicious dob-buri!

The Result: Wow, what a flavor combination! The combination of the sweet and savory soy-flavored chicken with the silky smooth egg was an amalgamation of great flavors. The addition of Sriracha to the rice bowl added a new dimension to the food, as the spiciness and sweetness of Sriracha matched perfectly with the flavor combination in the rice bowl.

Recipe: Chicken and Slow Poached Egg Rice Bowl; New Style "Oyakodon"

Cooking Time: About 25 minutes

Ingredients:

- 6 pieces of chicken thighs (NOT BREAST) cut in about 1 inch pieces.

- equal parts soy sauce, mirin, and sake

- Slow poached egg (See recipe)

- White or brown rice

- Sriracha Chile Sauce

Cook chicken at medium high heat with skin side down to crisp skin. Flip when skin is golden brown and crispy. After flipping, add sake, mirin, then soy sauce, (in that order) into frying pan. *WHEN ADDING LIQUIDS TO PAN, BE SURE NOT TO POUR LIQUIDS DIRECTLY OVER THE CHICKEN, AS THE LIQUIDS WOULD BE ABSORBED BY THE CHICKEN SKIN AND THE SKIN WOULD NOT CRISP.

Taste test the sauce; if too salty, add sake, add mirin to add sweetness to sauce.

Prepare one bowl of either Japanese white rice or brown rice. Put chicken on top of the rice.

Crack soft poached egg one at a time into a small saucer. The thin white will not and should not be firm or solid. Tip the dish to pour off and discard the loosest part of the white, then slide the egg in the middle of the rice bowl.

Pour soy based sauce over the chicken and egg. Use Sriracha if needed.

Recipe: Slow Poached Egg Salad with Assorted Mushrooms


So I came back from school today, hungry and tired, as always, and realized that I had 3 magical Onsen Tamagos waiting for me in the fridge. I decided to explore what was in my fridge and see what creations I could make with these eggs. I found a huge bag of baby arugula and a box of mushrooms, so I thought about creating a salad with my slow poached egg.

To me, a good salad is extremely satisfying. A good salad has two characteristics: fresh ingredients, and good seasoning, meaning that the salad is not over-dressed.


I started sauteing some baby Portobellos and Crimini Brown Mushrooms on high heat with a tad of butter and garlic.


Arugula is a great choice of greens for salad. It has a crispness and an aromatic punch that is great for salads with strong dressings. Make sure to dry the Arugula thoroughly after washing, as wet arugula gets soggy and not very crisp.


The salad dressing consists of Dijon Mustard, Balsamic Vinegar, and Canola Oil. Using Extra Virgin Olive Oil is not preferred, as Extra Virgin Olive Oil is too strong and aromatic for the salad. Using a common oil like grapeseed oil or canola oil is good.


When mixing the salad, put the greens inside a large container or pot. Add a couple dollops of the dressing and mix with the tongs to evenly distribute the dressing. Be sure not to add too much dressing. When removing salad from the pot/bowl, there should be no remaining salad dressing at the bottom of the container.

The sauteed mushrooms go on top of the salad.

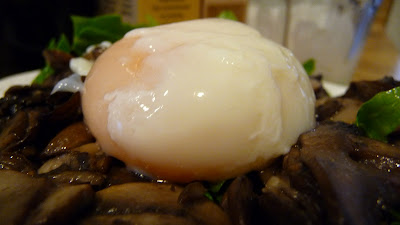
Wow what an egg! the Onsen Tamago came out perfectly, soft, creamy, and silky smooth.

Just added some goat cheese, and there you go.


The Result: A great salad. Truly spectacular, as the mustard dressing was a great compliment to the crisp arugula. The addition of mushrooms brought a depth and earthiness to the dish. Lastly the Slow Poached Egg truly put the "cherry on the sundae." When mixing the egg with the entire salad, the amalgamation of the earthy mushrooms, the sharp arugula, and the rich mellow Dijon Mustard dressing was truly incredible. If there was one flaw, it was the goat cheese. The cheese was not a bad addition, but neither was it a good addition. Chunks of goat cheese occasionally overpowered my palate with the delicate egg and mushrooms. Maybe next time, adding garlic croutons instead of cheese would be better for this salad.

*NOTE: I was experimenting on this recipe, and the recipe is not really accurate, so when I redo this recipe in the near future, I will update this recipe with precise measurements.

Slow Poached Egg Salad with Assorted Mushrooms:

Cooking Time: 15-25 minutes

Ingredients:

- 3 stuffing-size Portobello Mushrooms

- about 6 Crimini Mushrooms

- 1 clove of garlic

- a big handful of Arugula

- 1 slow poached egg (see previous recipe)

- 1 tablespoon Dijon Mustard

- equal parts canola oil and Balsamic Vinegar

- goat cheese (Chevre from Trader Joes)

Sautee Criminis and Portobello mushrooms on a hot frying pan with canola oil and garlic. Other assortment of mushrooms would work as well, such as Shiitakes, Chanterelles, Eringis, Hen of the Wood, etc. Add salt and pepper. Cook until mushrooms become tender.

Add dijon mustard with oil and vinegar. Whisk. Taste test. If dressing requires more sweetness, add more balsamic vinegar. The color of the dressing should be similar to that of smooth peanut butter.

Put a handful of washed and paper-towel-dried arugula inside a big pot. Add about 4-6 dollops of dressing to the arugula. Mix salad with either hands or with tongs. Taste test. If there is too much dressing on arugula, add more arugula. Add more dressing if needed.
*NOTE: when transferring arugula from pot to plate, there should be no remaining excess dressing at the bottom of the pot. If there is, add more arugula to pot.

Plate the arugula. Add mushrooms on top of the arugula.

Crack open the slow poached egg inside a small bowl. Remove uncooked runny egg white and add poached egg on top of the salad.

Add crumbled goat cheese (which was a mistake so don't do it, instead add some garlic croutons or something with texture. That would be better!)


Thursday, March 11, 2010

Recipe: Slow Poached Eggs: (Onsen Tamago)


Its a typical Thursday afternoon, and I have no homework, no studying, nothing. My mom just bought a carton of cage free large eggs, so what better way to eat them by poaching eggs, or even better, slow poaching eggs...

To me, slow poached eggs, or Onsen Tamago in Japanese, are one of my favorite methods of cooking eggs. I can't tell you how many people ooh and ahh when I crack a cooked egg out of what looks like an uncooked intact eggshell.

In fact when I first saw the Onsen Tamago in Japan, I thought the Japanese had altered the egg with technology, or something crazy like that. But legend has it that old ladies would bring baskets of eggs with them to the natural hot springs that are all around Japan (hot springs and public baths are important national pastimes), and while they were there, the hot spring water cooked the eggs at a constant temperature of around 60 degrees C, or about 141 degrees F. The technique produces eggs that, because they are slowly coaxed into cookedness, are creamier and more unctuous than regular poached eggs.

No pictures today, but I'll put these eggs in the fridge after I cook them, and use them tomorrow in something. Hopefully they turn out yummy...

Slow Poached Eggs (Onsen Tamago):

Cooking Time: About 45 minutes

- Eggs

Directions:

Fill your biggest, deepest pot with water and put it on the stove over the lowest possible heat.

Use something to keep the eggs from sitting on the bottom of the pot, where the temperature will be highest. If you have a cake rack or a steamer rack, use it. If not, improvise: a few chopsticks scattered helter skelter across the bottom of the pan will do the trick.

Use an instant-read thermometer to monitor the temperature in the pot, if its too hot, add cold water or ice cubes. Once the water is between 140-145 degrees Fahrenheit, add the eggs to the pot. Let them bathe for 40 to 45 minutes, checking the temperature regularly with the thermometer or by sticking your finger in the water (it should be the temperature of a very hot bath), and moderating it as needed.

Use eggs immediately or store them in the fridge for up to 24 hours. If you plan on storing them, chill them until cold in an ice water bath. If you refrigerate eggs, warm them under hot tap water for about a minute before using.

To serve the eggs, crack them one at a time into a small saucer. The thin white will not and should not be firm or solid. Tip the dish to pour off and discard the loosest part of the white, then slide the egg on the dish it's destined for.

Wednesday, March 10, 2010

Recipe: Steak Comparison


So I got a phone call from my mom, asking me what I wanted from Mitsuwa Market. I was in the mood for some steak, so I told her to buy some good beef. And she certainly did. She bought two steaks, one which was a new york strip steak Angus Prime. The other was a Snake Valley Wagyu chuck steak. Both were about 0.68 lb, which was a bit small, but steak is steak.

*Note, please excuse my terrible photography in this post, as I am still learning how to take good photos of food.

The first steak was a Certified Angus Beef New York Steak.


Searing at a high heat is extremely important when cooking steak. By cooking at a high heat, the meat seals in all of its juices, and forms almost like an outer crust, which is crucial for a great steak.

Unfortunately I didn't put enough color on the steak, and was not able to get that crust on steaks that seal in the flavor of the meat. I should have seared the meat longer, but oh well...


After flipping the steak, lower the heat and add some butter with cracked garlic to bast the steak. Basting the steak with some butter and garlic is important, as it adds flavor and depth to the meat, elevating the steak to a whole new dimension.

After cooking the steak and taking it off the pan, I made a sauce consisting of beef stock and port wine with the beef scrapings on the pan. I reduced it until it thickened.

The reduced sauce...

After resting for about 8 minutes, I cut into the steak, hoping for a good medium rare to rare. I was pleased with the color, as the beef turned out to be just about medium rare.

Duo of Beef: One way with port wine reduction with a Crème fraiche horseradish sauce; the other with some Yuzu Kosho, a Japanese condiment made from yuzu, yuzu rind, japanese pepper (sansho), and pepper. Yuzu Kosho could be bought at your local Asian food market.

The Result: The classic American steak taste; the meat had a great texture which was complimented with the Port Wine sauce as well as the horseradish sauce. The Yuzu Kosho, on the other hand, had a kick to it, and truly heightened the flavor of the beef. The beef, however, could have tasted better with a better outer crust to it.

The next beef was a Snake River Valley Chuck Steak. Snake River Valley Farms are known to raise cattle in the US similar to cows that produce Kobe Wagyu Beef in Japan. The beef from Snake River Farms (aka American Wagyu) is known to have similar marbling and texture, but I'll judge that after eating. Note the marbling of fat on this compared to the lean Angus New York Steak.

Like the Angus beef, the American Wagyu was cooked at a high heat to form the steak crust.

What a crust! I was very pleased with the crust on this steak. Compare the crust on this compared to the crust on the Angus beef, as you can tell that the browning on this steak is much darker and more evenly distributed throughout the steak.

Basting the steak with butter and garlic.

There was much more scrapings on the pan on the American Wagyu compared to the Angus beef, so I added more stock and wine to make the wine reduction. The portion of wine and stock was proportional to that of the reduction with the Angus beef.

The beef had great color, as I was looking to make this steak a bit more rare than Angus beef.

Eaten with the wine reduction and the Crème fraiche horseradish mix.

The Result: An extremely rich and buttery flavor, almost similar to that of foie gras. Unlike the Angus beef, the American Wagyu had marbling which significantly made the beef much more tender and flavorful than the Angus beef. The horseradish and meat came together perfectly, as the horseradish had a kick which complimented the richness of the American Wagyu.

Of course my parents wanted in on some of the beef, but they wanted the American Wagyu cooked a bit more. So I took out my cooking blow torch and torched some of the meat. The smell coming from the meat was amazing...

The beef was eaten with some of the Yuzu Kosho and some Oroshi Wasabi.

The Result: Wow what a difference! The blow torch made a stronger charred taste to the meat, which in fact, tenderized the meat even more, making it almost melt-in-your-mouth tender. The condiments of wasabi and yuzu kosho were a perfect match for the beef, as they both had very strong flavor profiles and complimented the meat without overpowering it.

So which is better? The Angus beef, or the American Wagyu? Well its obviously personal preference, and it depends on how one prepares the beef. I prepared both cuts of beefs almost exactly the same, and I can conclude that based on how I prepared it, the American Wagyu had a better flavor profile over the Angus beef. But I couldn't help, but comparing the American Wagyu to the real Wagyu I had in Japan about a year ago. Though the American Wagyu was very tender and had a great flavor, it can not compare to the texture of real Wagyu beef. Japanese Wagyu is so tender and flavorful, it truly can not be matched with American Wagyu. Of course, I have not compared American Wagyu and Japanese Wagyu side to side, so its hard for me to truly compare the two.

Anyway heres the recipe:

Duo of Steak: with Port Wind Reduction and Creme fraiche, and with Yuzu Kosho

cooking time: about 20 minutes

Ingredients:

- 0.68 lb new york steak or chuck steak (*NOTE RECIPE IS FOR 0.68 lb STEAK. COOKING TIME FOR STEAK MAY VARY BASED ON WEIGHT OF STEAK)

- salt (preferably Maldon Salt)

- coarse black pepper

- 1 to 3/4 tablespoon of butter

- 1 garlic clove

- canola oil.

Directions:

Leave steak out for about 30 minutes after removing from the refrigerator until beef becomes room temperature. Heat stove up to high, and add a tablespoon of canola oil. Season beef liberally with salt and pepper before cooking. When the oil starts smoking from the pan, the pan is ready for searing.

Sear beef on one side for approximately two minutes, or until the beef forms a dark brown crust. Flip the beef, and turn off the heat. Remove pan off stove, and add butter and cracked garlic to the edge of the pan. As soon as the butter melts, start basting: use one hand to tilt the pan up at a 45 degree angle and, with the other hand, use a very large spoon to scoop up butter from the pool in the pan and spoon it over the steak. Repeat this motion constantly, cloaking the steak in an eddy of aromatic melted butter. After about 1-2 minutes of basting, remove steak from the pan.

Rest the meat. I know you'll have the urge to cut it, slice it, but don't. Leave it alone or else you'll regret it for the rest of your life. No touching for about 8 minutes.

Port Wine Reduction


- 1/2 cup Trader Joes Beef Stock

- 1/2 cup Port Wine

- Beef Scrapings

Directions:
Add beef stock and port wine to a hot pan with beef scrapings.

Creme Fraiche Horseradish Sauce:
DIrections:
Add equal parts of Creme Fraiche and Horseradish. If Creme Fraiche is not available, use sour cream. And if sour cream is not available, use asian mayonnaise, which has more tang and flavor than American Mayo.

Tuesday, March 9, 2010

Recipe: Good Ol' Vanilla Ice Cream


So the other day, my parents asked me what I wanted for my 18th birthday. I really had nothing in my mind, so I immediately thought about all of the possible cooking utensils and products that I have yet to buy. At the time, I was reading the dessert section of Thomas Keller's cookbook AD HOC AT HOME. Just then, I saw a recipe for making vanilla ice creams that made me realize what I have always wanted: an ice cream maker.

I ended up buying a Cuisinart ice cream maker for about 80 bucks at William Sonoma, and immediately started preparing to make some ice cream. I was leaning toward making a milk/cream based ice cream rather than an cream/egg yolk based ice cream, simply because I was way too lazy to crack open 8-10 eggs and extract the egg yolks, and yada yada yada....

For my first ice cream, I decided to use Alton Brown's recipe for "Serious Vanilla Ice Cream." The recipe called for way too much sugar, and made the ice cream mixture ridiculously sweet. So I added extra heavy cream.

The result: An extremely rich and decadent ice cream with a sweetness that didn't overwhelm my palate.


On this occasion, my friends and I ate the ice cream with some fresh berries, crepes, and melted chocolate.


GOOD OL' VANILLA ICE CREAM
cooking time: about 1 hour
actual time it takes to make: about one day

Directions:
Ingredients
  • 2 cups half-and-half
  • 1 cup whipping cream
  • 1 cup minus 2 tablespoons sugar
  • 1 vanilla bean, split and scraped

directions

Combine all ingredients (including the bean and its pulp) in a large saucepan and place over medium heat. Attach a frying or candy thermometer to inside of pan. (see note below) Stirring occasionally, bring the mixture to 170 degrees F. Remove from heat and allow to cool slightly. Remove the hull of the vanilla bean, pour mixture into lidded container and refrigerate mixture overnight to mellow flavors and texture.

After refrigerating, a thin film of thicken cream may form at the surface of the ice cream mixture. Remove the film of cream, and taste. If too sweet, add cold heavy cream.

Freeze mixture in ice cream freezer according to unit's instructions. The mixture will not freeze hard in the machine. Once the volume has increased by 1/2 to 3/4 times, and reached a soft serve consistency, spoon the mixture back into a lidded container and harden in the freezer at least 2-3 hours before serving.

NOTE: If you do not have a thermometer, bring the mixture just barely to a simmer. As soon as you see a bubble hit the surface, remove it from the heat. Do not let it boil.